Common SQL commands and syntax


Select Statement
SELECT 'column_name' FROM 'table_name'

Distinct
SELECT DISTINCT 'column_name' 
FROM 'table_name'

Where
SELECT 'column_name' 
FROM 'table_name'
WHERE 'condition'

In
SELECT 'column_name'
FROM 'table_name'
WHERE 'condition'

Between
SELECT 'column_name'
FROM 'table_name'
WHERE 'column_name' BETWEEN 'value1'
AND 'value2'

Like
SELECT 'column_name'
FROM 'table_name'
WHERE 'column_name' LIKE {PATTERN}


Order By
SELECT 'column_name'
FROM 'table_name'
[WHERE 'condition']
ORDER BY 'column_name' [ASC, DESC]

Count
SELECT COUNT ('column_name')
FROM 'table_name'

Group By
SELECT 'column_name1',
SUM('column_name2')
FROM 'table_name'
GROUP BY 'column_name1'

Having
SELECT 'column_name1',
SUM('column_name2')
FROM 'table_name'
GROUP BY 'column_name1'
HAVING (arithmetic function condition)

Create Table Statement
CREATE TABLE 'table_name'
('column1' 'data_type_for_column_1',
'column2' 'data_type_for_column_2', ...)

Drop Table Statement
DROP TABLE 'table_name'

Truncate Table Statement
TRUNCATE TABLE 'table_name'

Insert Into Statement
INSERT INTO 'table_name' ('column1', 
'column2', ...)
VALUES('value1', 'value2', ...)

Insert Into Select Statement
INSERT INTO 'table1' ('column1','column2',...)
SELECT 'column3', 'column4', ...
FROM 'table2'

Update Statement
UPDATE 'table_name'
SET 'column1' = [new value]
WHERE {condition}

Delete From Statement
DELETE FROM 'table_name'
WHERE {condition}

How to setup Wordpress on Windows with XAMPP server

Hi, you might need a website, a blog, or a web app. You heard Wordpress but did not know how to start, this tutorial is perfect for you. First, you need to have a practice Wordpress site on your computer so that anytime-anywhere with your computer with you, you can try to play around with Wordpress.     

So today, I would like to make a tutorial for beginners on how to setup a Wordpress CMS on your local Windows machine.

If you do not have any web server installed on your machine, or in other case you like a windows development environment. You might need something like XAMPP or Cross-Platform (X), Apache (A), MariaDB (M), PHP (P) and Perl (P). Click here if you like to setup your XAMPP first. Of course there are other web server like MAMP, LAMP, and WAMP but for this tutorial I prefered XAMPP.

If you already installed and configured XAMPP you might see this page once you open http://localhost on your browser.
For beginners, XAMPP is an ideal local development environment, and its not meant for production deployments. As stated at XAMPP local dashboard page. However, if you need the real deal then XAMPP suggest to go here https://www.apachefriends.org/hosting.html

Let say you already setup your XAMPP.


1.) Open your web browser (in my case I have Google Chrome) then navigate to https://wordpress.org/download/
2.) Click Download Wordpress 4.9.1 (by the time of this post)


3.) Locate htdocs. Usually it is located at C:\xampp\htdocs
4.) Check wordpress filename. Initially it is a compressed zip file
5.) Click save button


6.) Once you have finished downloading a 9.9 MB wordpress-4.9.1.zip file, click the small down arrow button
7.) Then, click Show in folder menu (this will pop up the XAMPP htdocs window)


8.) Right click the wordpress-4.9.1 file then click Extract Here (using winrar)


9.) Then you will see Winrar extracting
10.) the wordpress folder


11.) Open your web browser and navigate to http://localhost/wordpress
12.) Select the language of your choice
13.) Then, click Continue button


14.) Click Let's go! button

Then you should see the next page which is related to database connection details. Skip this for a while because we need to make sure that the wordpress installation do not halt with errors due to the absence of the database that are needed by wordpress.


15.) So wee need add wordpress database first. Open another browser or another tab of the Google chrome browser and navigate to http://localhost/phpmyadmin
16.) Login the root account
17.) Then click Go button


18.) Now you should logged-in to the phpMyAdmin and click New button
19.) Type the name of the database that you need to add. This time type wordpress
20.) Then, click Create button


21.) Now go back to the previous page(wordpress installation page) wherein you are about to fill up some database connection details. Fill up all the information needed to create the connection of wordpress to its database. For this instance please follow below:
  • Database Name : wordpress
  • Username: root
  • Password: [the password you have setup for root]
  • Database Host: localhost (leave as is)
  • Table Prefix : wp_ (leave as is)
22.) Click Submit button


23.) Now click Run the installation button.


24.) On my local XAMPP server, it just take almost 5 seconds to show up with this page. You just need to fill up the information needed for the final setup of wordpress.
  • Site Title : [your choice of website title] 
  • Username : [your initial wordpress admin user]
  • Password : [your initial wordpress admin password]
  • Your Email : [provide your initial wordpreass admin email address]
  • Search Engine Visibility : [just leave uncheck if you to discourage search engine to index your site, anyway this is just your development environment setup, so either way should OK]
25.) Finally, click Install Wordpress button, and wait for wordpress to finish the installation process


26.) After waiting for almost 2 minutes, wordpress installation successfully finished. Then click on the Log In button to proceed.


27.) Then type your Login credentials
28.) And click the Log In button


29.) Congratulations! you are now Logged in to the Wordpress administration page

30.) To logout, hover the mouse on the upper right corner of wordpress administration page
31.) Then click Log Out menu

33.) Then you will be redirected to http://localhost/wordpress/wp-login.php?loggedout=true, or you may go to http://localhost/wordpress/wp-admin to Login again

32.) To see your wordpress site open a Google chrome browser and navigate to http://localhost/wordpress
The wordpress front page has a one page design by default. Changes you made in the administration page will be affected the front page.


On my future articles:
  • How to create customized themes on Wordpress
  • How to create plugins
References:
wordpress.org

MariaDB replication setup on CENTOS Linux


It is nice to think that somehow we have fault-tolerance in our database even we only have two servers running on our network. It lessens our worries that in any point of time we do not know when the server crashes and leave us problems in restoring data from the backup. So we need duplicates of our data or something that copies our data from one server to another as a real-time backup which also increases performance and improves reliability and availability. It requires sharing information between resources but it differs from clustering.

So here's what we called Replication, that we will be going to apply on a CENTOS machine. Basically, we only need at least two servers, the Master, and a Slave.

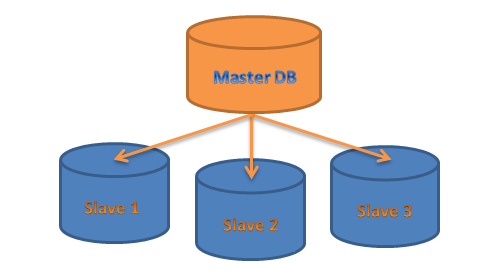
But in the real world application, replication can have one Master and multiple Slaves.

Some of the benefits of replication are the following:

  • Scale-Out Solutions
    • Spread load among multiple slaves
    • All write and updates must occur on master
    • Reads can occur on any slave
  • Data Security
    • Backups can be performed on slaves without affecting master (Ability to save data)
  • Analytics
    • Data analysis can be performed on any slave without affecting speed of master or other slaves
  • Long-Distance Data Distribution
    • Allows branch offices to have dedicated, offline server

But for this blog post, I will only configure a Master and a Slave setup.

On the Master server

1.) Connect to the server's ssh using putty

2.) Then vi/nano to /etc/my.cnf
#nano /etc/my.cnf

3.) Append the text below under [mysqld]:
#Binary Logging (For Replication)
log-basename=master
log-bin
binlog-format=row

4.) Then restart mariadb service
#system restart mariadb

5.) Then open MySQL Workbench, and connect to the Master server. And create a replication user then make sure your password you will set must not be longer than 32 characters in length and also not contains a "#" sign same for the user. Follow the sequence below:

6.) Then lock all tables to prevent changes

  • Issue the following SQL query on the Master server using MySQL Workbench
    • FLUSH TABLES WITH READ LOCK;
      • Won't let you update tables
      • Does not clear tables, but clears cache
      • Lock remains in effect until session is closed
  • View the current coordinates to the binary log on the master server
    • SHOW MASTER STATUS
7.) Then set global server_id by issuing SQL query again:
set global server_id = 1;

8.) You may check and see the server_id:
show variables where variable_name = 'server_id';

On the Slave server

9.) Then connect to the SQL of your Slave server using MySQL Workbench
set global server_id = 2;

10.) Check server_id of Slave
show variables where variable_name = "server_id";

11.) Make sure slave is stopped first by issuing SQL query to the Slave server
slave stop;

11.) Then issue the following SQL query to configure slave:
change master to
master_host = '[IP address of the master] ',
master_user = '[Replication user]',
master_password = '[The password of the replication user]',
master_log_file = '[ can be seen at /var/lib/mysql (eg. mariadb-bin.000001) and by using "SHOW MASTER STATUS" at Master server SQL query]',
master_log_pos = [Log Position shown at Master server using "SHOW MASTER STATUS"(eg. 2221)],
master_port = 3306,
master_connect_retry = 10;

12.) Then start slave by issuing SQL query to the Slave server
slave start;

13.) Then check the slave status. You may found errors if there's any.
show slave status;

14.) Append to /etc/my.cnf of the Slave server
[mysqld]
server_id=2

Troubleshooting
  • Be sure that the firewall on the master allows communication
    • #firewall-cmd --list-ports
    • TCP Port 3306
  • Ping the master from the slave
  • Telnet from the slave to the master on port 3306
  • Verify binary logging has different server-id
  • Verify user account has remote privileges and is configured for replication in "Global Privileges"
14.) There you go, you may see if replication is working, update a record on your Master server and check if the same database record on the Slave server copies the exact data.

Referrences:
mariadb.org
https://linoxide.com/how-tos/configure-mariadb-replication-centos-linux/
https://www.unixmen.com/setup-mariadb-master-slave-replication-in-centos-7/
https://www.youtube.com/channel/UCjCs0BMeJUOLs8j79BP-4Uw