Showing posts with label Networking. Show all posts

Moodle: Network setup using dynamic or multiple IP in wwwroot

If you have multiple NIC to be used for local and public access. Sometimes you are facing this kind of problem in Moodle. All you have to do is change a PHP variable in config.php inside moodle web directory.
$CFG->wwwroot

value with :
$CFG->wwwroot = 'http://'.$_SERVER["HTTP_HOST"];

VLSM - Variable Length Subnet Mask

VLSM 
Variable length subnet mask is a technique that allows a network administrator to divide an IP address space into subnets of different sizes.


Subnetting
Allows you to create multiple logical networks that exist within a single class network.


Reasons why we subnet

  • It helps the preservation of address space in order not to waste address
  • It used for security
  • It helps to control network traffic due to collision of packets transmitted by other nodes on the same segment
Legend

Δ = Bit value
Sm = Subnet Mask
UIP = Usable IP
NA = Notable Address
   
       32
       - n   

where n = bits


VLSM Table 


Setup VPN on Local Network (Windows)


On Server Side
  1. Go to “New Connection Wizard” then “Click Next”
  2. Setup Advance Connection
  3. Select “Accept Incoming Connections” then “Click Next”
  4. Select “Allow virtual private connections” then “Click Next”
  5. Select “Users allowed to connect”
  6. Specify IP Address Range then “Click Next”
  7. Then finally “Click Finish”

On Client Side
  1. Configure IP Address, the gateway must be the IP Address of the Server
  2. Goto “New Connection Wizard” then “Click Next”
  3. Select “Connect to the Network at my workplace” then “Click Next”
  4. Select “Virtual Private Network connection” then “Click Next”
  5. Enter your “Company Name” it will become your connection name then “Click Next”
  6. Enter “Host Name” or “IP Address of the VPN Server you will be connecting”
  7. Then finally select “Make Shortcut on Desktop” then “Click Finish”

Testing Connection:
  1. On Client Side Double+Click the Shortcut on your Desktop then input your User Name and Password allowed on the Server then “Click Connect”
  2. You will notice the network is registering its connection
  3. On Server Side you will notice the connection labeled with your User Name will appear beside the LAN Connection.

pfSense Captive Portal passthrough port and ip address


If you need to allow certain application to run along with the log-in screen, for example 
a chat box on the pfSense's Captive Portal. you need to first allow a  specific port or an IP Address to passthrough a the Captive Portal.

Go to terminal

 nano /etc/inc/captiveportal.inc  

use ctrl+w to find

Any rule after this line
 # redirect non-authenticated clients to captive portal  
 add 65532 fwd 127.0.0.1,{$listenporthttp} tcp from any to any dst-port 80 in.....  

will get blocked so it should be added before it's blocked.

let say I want port 5900 to open in captive portal, I should:

 add 5900 pass tcp from any to any out  
 # redirect non-authenticated clients to captive portal  
 add 65532 fwd 127.0.0.1,{$listenporthttp} tcp from any to any dst-port 80 in.....  

Install PFSense+Lusca-Cache in VirtualBox and use a separate virtual drive as its cache


pfSense is an another type of protection for our vulnerable network. A modular router that can be customize base on your network needs. It has the ability to act as a router or a firewall, or even your cache server which means all your youtube, facebook, and other sites has being temporarily saved in a storage and soon if someone in your LAN access the same website it can instantly retrive or view without the irony of web page reload or to buffer the video again. That's why your internet might become faster

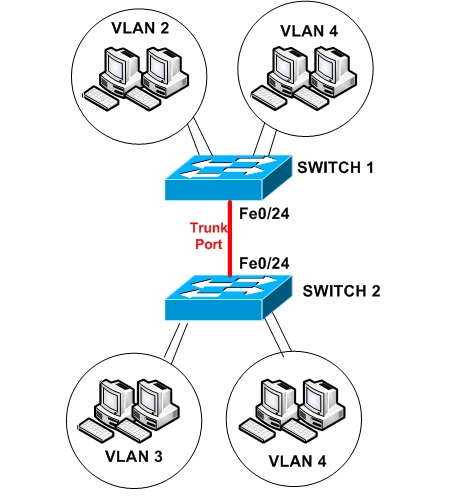
What is VLAN?


VLAN
Broadcast domain created by switches all ports in a single VLAN are in a single broadcast domain

Are VLANS Required?
It is important to point out that you don't have to configure a