MariaDB replication setup on CENTOS Linux


It is nice to think that somehow we have fault-tolerance in our database even we only have two servers running on our network. It lessens our worries that in any point of time we do not know when the server crashes and leave us problems in restoring data from the backup. So we need duplicates of our data or something that copies our data from one server to another as a real-time backup which also increases performance and improves reliability and availability. It requires sharing information between resources but it differs from clustering.

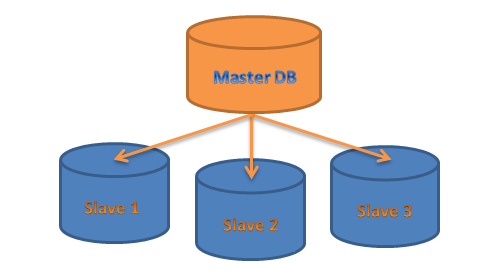
So here's what we called Replication, that we will be going to apply on a CENTOS machine. Basically, we only need at least two servers, the Master, and a Slave.

But in the real world application, replication can have one Master and multiple Slaves.

Some of the benefits of replication are the following:

  • Scale-Out Solutions
    • Spread load among multiple slaves
    • All write and updates must occur on master
    • Reads can occur on any slave
  • Data Security
    • Backups can be performed on slaves without affecting master (Ability to save data)
  • Analytics
    • Data analysis can be performed on any slave without affecting speed of master or other slaves
  • Long-Distance Data Distribution
    • Allows branch offices to have dedicated, offline server

But for this blog post, I will only configure a Master and a Slave setup.

On the Master server

1.) Connect to the server's ssh using putty

2.) Then vi/nano to /etc/my.cnf
#nano /etc/my.cnf

3.) Append the text below under [mysqld]:
#Binary Logging (For Replication)
log-basename=master
log-bin
binlog-format=row

4.) Then restart mariadb service
#system restart mariadb

5.) Then open MySQL Workbench, and connect to the Master server. And create a replication user then make sure your password you will set must not be longer than 32 characters in length and also not contains a "#" sign same for the user. Follow the sequence below:

6.) Then lock all tables to prevent changes

  • Issue the following SQL query on the Master server using MySQL Workbench
    • FLUSH TABLES WITH READ LOCK;
      • Won't let you update tables
      • Does not clear tables, but clears cache
      • Lock remains in effect until session is closed
  • View the current coordinates to the binary log on the master server
    • SHOW MASTER STATUS
7.) Then set global server_id by issuing SQL query again:
set global server_id = 1;

8.) You may check and see the server_id:
show variables where variable_name = 'server_id';

On the Slave server

9.) Then connect to the SQL of your Slave server using MySQL Workbench
set global server_id = 2;

10.) Check server_id of Slave
show variables where variable_name = "server_id";

11.) Make sure slave is stopped first by issuing SQL query to the Slave server
slave stop;

11.) Then issue the following SQL query to configure slave:
change master to
master_host = '[IP address of the master] ',
master_user = '[Replication user]',
master_password = '[The password of the replication user]',
master_log_file = '[ can be seen at /var/lib/mysql (eg. mariadb-bin.000001) and by using "SHOW MASTER STATUS" at Master server SQL query]',
master_log_pos = [Log Position shown at Master server using "SHOW MASTER STATUS"(eg. 2221)],
master_port = 3306,
master_connect_retry = 10;

12.) Then start slave by issuing SQL query to the Slave server
slave start;

13.) Then check the slave status. You may found errors if there's any.
show slave status;

14.) Append to /etc/my.cnf of the Slave server
[mysqld]
server_id=2

Troubleshooting
  • Be sure that the firewall on the master allows communication
    • #firewall-cmd --list-ports
    • TCP Port 3306
  • Ping the master from the slave
  • Telnet from the slave to the master on port 3306
  • Verify binary logging has different server-id
  • Verify user account has remote privileges and is configured for replication in "Global Privileges"
14.) There you go, you may see if replication is working, update a record on your Master server and check if the same database record on the Slave server copies the exact data.

Referrences:
mariadb.org
https://linoxide.com/how-tos/configure-mariadb-replication-centos-linux/
https://www.unixmen.com/setup-mariadb-master-slave-replication-in-centos-7/
https://www.youtube.com/channel/UCjCs0BMeJUOLs8j79BP-4Uw

Install Samba (Windows Share) on CENTOS 7


It is important for web developers to access the web files on a development server. However, if dev team requires to access it via windows share over CENTOS machine, then we need to install Samba.


Here's my quick list of installing Samba on CENTOS.

1.) Check for existing samba package if any using the following commands
#rpm -qa | grep samba
#yum list installed | grep samba

2.) If samba is installed, remove it using the below command
#yum remove samba*

3.) For SMB new User. Create a user and add to a group
#useradd -s /sbin/nologin [username]
#groupadd [smbgroupname]
Note: To know more about managing user and group just click here

4.) Now, install samba using the following command
#yum install samba* -y

5.) Assign the user username to  [smbgroupname], and set samba password to that user
#usermod -a -G [smbgroupname] [username]
#smbpasswd -a [username]

6.) Create a new share called “/samba/secure_share” and set the permissions to that share
#mkdir /samba/secure_share
#chmod -R 0755 /samba/secure_share
#chown -R [username]:[smbgroupname] /samba/secure_share

7.) Edit samba config file;
#vi /etc/samba/smb.conf

8.) Add the below lines at the bottom of samba config file.
[secure_share]
path = /samba/secure_share
writable = yes
browsable = yes
guest ok = no
valid users = @[smbgroupname]

9.) Test the samba configuration for any errors.
#testparm

10.) To start Samba service on system boot
#systemctl start smb
#systemctl start nmb
#systemctl enable smb
#systemctl enable nmb

11.) Firewall configuration. Allow Samba server default ports through firewall.
#firewall-cmd --permanent --zone=public --add-port=137/tcp
#firewall-cmd --permanent --zone=public --add-port=138/tcp
#firewall-cmd --permanent --zone=public --add-port=139/tcp
#firewall-cmd --permanent --zone=public --add-port=445/tcp
#firewall-cmd --permanent --zone=public --add-port=901/tcp

#firewall-cmd --permanent --add-port=137/tcp
#firewall-cmd --permanent --add-port=138/tcp
#firewall-cmd --permanent --add-port=139/tcp
#firewall-cmd --permanent --add-port=445/tcp
#firewall-cmd --permanent --add-port=901/tcp

#firewall-cmd --list-ports

12.) Restart firewall to apply the changes.
#firewall-cmd --reload

13.) SELinux Configuration ( Skip this part if you already disabled SELinux)

Turn the samba_enable_home_dirs Boolean on if you want to share home directories via Samba.
setsebool -P samba_enable_home_dirs on

Label  the /samba/secure_share/ with samba_share_t so that SELinux allows Samba to read and write to it.

#chcon -t samba_share_t /samba/secure_share/
#systemctl restart smb
#systemctl restart nmb

14.) To disable SELinux, edit file /etc/sysconfig/selinux,
#vi /etc/sysconfig/selinux

15.) Set SELinux value to disabled.
#SELINUX=disabled

16.) Finally, browse the shared folder you have configured.

References:
https://www.unixmen.com/install-configure-samba-server-centos-7/

Moodle: Network setup using dynamic or multiple IP in wwwroot

If you have multiple NIC to be used for local and public access. Sometimes you are facing this kind of problem in Moodle. All you have to do is change a PHP variable in config.php inside moodle web directory.
$CFG->wwwroot

value with :
$CFG->wwwroot = 'http://'.$_SERVER["HTTP_HOST"];

CENTOS Linux Filesystem Layout


Path Description
/ Root Directory. Also contains all the key directories for the system.
/root Root Home Area. Where all root's personal configuration and files are located.
/etc Contains all important file configuration and settings for server applications. 
/proc A virtual representation of the status of the machine. It is a virtual filesystem used by the kernel to communicate with userland tools.Usually details of running system in the CPU can be seen using (/proc/cpuinfo), while the memory usage in (/proc/meminfo) etc.
/var Short for variable. Which web contents (/var/www/html) and system log files (/var/log/) resides. Usually takes disk space quickly. That's why it is highly suggested to put this in a separate disk and also using Logical Volume Management(LVM) disk partition so that it will allows dynamic creation and resizing.
/boot Contains the boot loader which are files that are needed to boot CENTOS. Includes configuration and kernel.Usually takes small partition size on the beginning of the disk.
/bin and /sbin /bin Contains most of the user programs, while /sbin contains administration tools and privileged binaries.
/dev Location for all devices files on the Linux system.
/home Contains files and folders of users. 
/lib System libraries
/lost+found Can be found in the root of ext2 or ext3 filesystem. Files and folders that are damaged, detached or missing from the system are restored here during disk checking (fsck) so that it can be recovered. 
/media Located on newer Linux systems which holds the mount point for removable storage such as USB drive.
/mnt Located on older Linux systems
/usr Contains the majority of user software. /usr/bin for regular user while /usr/sbin for root.
/opt Usually used by large third party applications.
/srv Contains files that are used by services. Most of the services use other location such as /var instead.
/sys Contains information about the system.
/tmp Contains temporary files and folder. It can be emptied once the system has been rebooted. It can be a perfect location if you have a temporary file to utilize. Take note that it is not safe to leave important files here.

To learn more just go to: https://en.wikipedia.org/wiki/Linux_Standard_Base